Endpoint Insights
Config Baseline Remediation – Creating the Baseline
Topics: Endpoint Insights
In this post I’ll show you how to create the baseline when using Configuration Baseline Remediation. In my last post, Configuration Baseline Remediation – Configuration Item, I showed you how to create a Configuration Item (CI) to fix a problem I encountered back in 2013. This post continues where the other one left off by showing you how to create the baseline for this CI.
I will be using Configuration Manager Current Branch 1802 for my screenshots. Even though there will be some variation between versions of SCCM, the basic principles are the same. After showing you how to create a Configuration Baseline, I will demonstrate how to deploy it to a collection.
Background
In 2013, I encountered a problem where my network drives (Where Are My Network Drives?) were not available to an application when I ran the application using elevated permissions. In order to solve the problem I added a registry value, rebooted the servers, and then tested everything to ensure that it worked correctly. At the time, I thought, “What would I do if I needed to do this for hundreds or thousands of systems? That’s a lot of manual work!!” One option would be to create a package and program in System Center Configuration Manager (SCCM) to deploy the registry key, but what if you added new systems over time? Configuration Baseline Remediation to the rescue!
Missing Network Drives
Microsoft blocks access to network drives for security reasons. Although I understand the reasoning behind it, it interferes with my daily tasks. Please see Some Programs Cannot Access Network Locations When UAC Is Enabled for the full Microsoft article.
Fortunately, though, the solution is fairly simple:
Create a registry key EnableLinkedConnections under HKEY_LOCAL_MACHINESOFTWAREMicrosoftWindowsCurrentVersionPoliciesSystem with the value of 1.
Remember a reboot is required before this registry key takes effect. Once it takes effect, this update allows me to see all of my network drives when running applications using elevated permissions.
What is the Difference between a Configuration Item and a Baseline?
In a nutshell, a Configuration Item (CI) is looking at one specific item such as a registry key, a file, etc. A configuration baseline, on the other hand, is made up of one or more CIs.
The more CIs added to the baseline, the more items that are evaluated together. This means that if one CI within the baseline is in an error state then the whole baseline will be in an error state.
The second difference between a CI and a baseline is that, unlike a baseline, a CI cannot be deployed, and conversely, a baseline cannot be deployed without a CI.
How to Create a Configuration Baseline
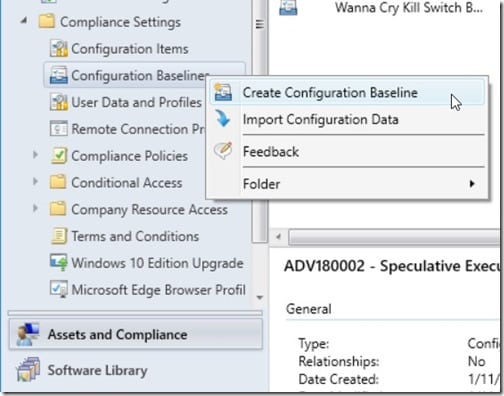
In the SCCM Current Branch console, under the Assets and Compliance workspace, expand Compliance Settings. Right-click on Configuration Baselines and select Create Configuration Baseline.
Give your new baseline a name (in my example it’s EnableLinkedConnections), then click on the Add drop-down button and choose Configuration Items.
Select the Configuration Item (CI) from the Available configuration items section and then click on the Add button. In this example, I’m selecting EnabledLinkedConnections.
Once you click on the Add button the CI will move to the Configuration items that will be added to this configuration baseline section. Notice that you can add more CIs to a baseline if you want. However, in this example, I will only be using one CI.
After adding the CI, click OK.
Click on the OK button, once again, to finish creating the Configuration Baseline.
In the above screenshot you can see that my recently created Configuration Baseline is now available to be deployed.
How to Deploy a Configuration Baseline to a Collection
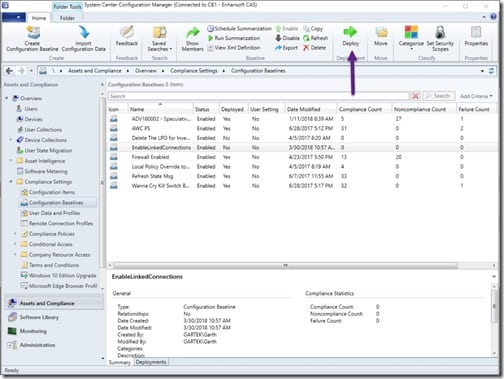
Select the newly created baseline (EnableLinkedConnections) and choose Deploy from the ribbon.
Select both Remediate noncompliant rules when supported and Allow remediation outside the maintenance window. This will allow the CI to be fixed ASAP at the next computer reboot. Click on the Browse… button to select a collection.
Select the appropriate collection and then click OK. In this example, I selected, All Desktop and Server Clients.
At this point, you can specify the schedule for the baseline. I’m okay with having this registry key checked weekly, so I will keep everything as is. Finally, click on the OK button.
With that last step completed, the Configuration Baseline is deployed to my collection.
How to Check the Status of a Configuration Baseline
If you want to see the status of a baseline, simply perform the following steps.
On a computer open the Configuration Manager control panel applet. Select the Configurations tab, then select the Configuration Baseline that you want to evaluate and then click on the Evaluate button.
A few seconds later you will be able to tell whether or not the Configuration Baseline is compliant. Fortunately, my baseline is compliant!


