Endpoint Insights
How Can I Add a Title to a SCCM Report?
Topics: Endpoint Insights
How Can I Add a Title to a SCCM Report?
There are two methods you can use to add a title to a SCCM report. In this post I will show you both, including my favorite!
I love talking about SCCM reports. Along with explaining the “ins” and “outs” about reporting, I also enjoy mentoring. I have seen a lot of creative report writing lately, but sometimes the basics are missing. When I start mentoring someone, I always ask for a copy of their latest project. Typically, I will see a report that looks similar to the one below. It provides all the details the person wants, but what is this report showing me? Is it showing me the number of laptops, desktops, servers, and VMs that are over 4-years-old? Or, is this the total number of machines in their lab? I’m not sure, so this is why adding a title to a SCCM report is important.
Heading Styles
As I mentioned earlier, there are two ways you can add a title to a SCCM report. One way is to use the built-in header feature with SQL Server Reporting Services (SSRS) and the other way is to create your own heading.
Personally, I like to create my own heading because it gives me more options. Besides the first page, I don’t want to see the title on any of the other pages because then I can use the entire page for the report. You might think this is a strange notion at first, but once you start adding prompt values to your title (see next week’s blog post) then you’ll see that a heading can take up a lot of space.
Use the Built-in Header Feature
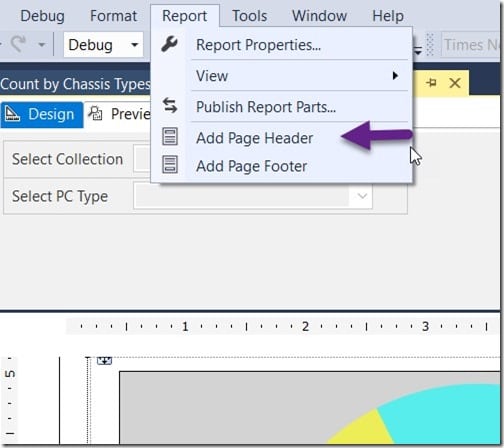
Using the built-in header feature in SSRS is easy. Select the Design tab, go to the Report tab and then select Add Page Header.
A header area will be added to the top of your report. By the way, I highlighted the header area in this screenshot in order to make it more visible. The default size for a report header is 1-inch.
Here is the problem as I see it: When using the built-in feature’s settings, the header will get displayed on all pages. This reduces the area available for the report from 8.5” x 11” to 8.5” x 10” (this does not include report margins).
I’ll demonstrate the problem by adjusting the page sizing in order for my chart to be too big for a single page. In the end the chart is split in two and the remainder of the report spills onto a third page because of the header (the third page is not shown). Notice in the example above how the report header is repeated and then the chart continues.
There is an option to turn the header off on the first and the last page, but not for the in-between pages. Since I only want the title to appear on the first page, I need to create my own heading. This is why I say that there are two different styles.
Create a Custom Heading

It’s not difficult at all to create your own report heading. All you are doing is adding one or more text boxes. There are no big tricks!
Looking above at the same report from my previous example, notice how the second page doesn’t have a header? This means that there is an extra inch of room to display more details. In this case, the second page of this report continues to show the chart and now the table fits all on the same page. There is no longer a need for a third page!
Tips to Add a Title to a SCCM Report
Here are a few tips that I can give you about report headings:
- Ideally the font size should be 20pt.
- The title should be bolded.
- Center the primary title.
- Place the header at least 0.25 of an inch from the left, right and top margins of the report.
- Using images, such as a logo, within a title is okay.
- Use subtitles. See my blog post next week for more information about how you can add a prompt value to a title.
- If you want to include a subtitle, use a smaller font size. Also, consider using a different font color.
If you have any questions about how to add a title to a SCCM report, please feel free to contact me @GarthMJ or reach out to Recast Software here.


