In this post, we will explore how to use the ConfigMgr Administration Service to retrieve all available applications in your environment. We’ll then demonstrate how to use this list to dynamically build variable lists for application installations. This is particularly beneficial when you have multiple versions of the same application in your environment and need to install the latest version.
What is the ConfigMgr Administration Service?
The ConfigMgr Administration Service, part of the SMS Provider, offers API access over HTTPS. This REST API utilizes the Open Data (OData) v4 protocol, facilitating seamless interactions with the ConfigMgr site server. It allows you to perform API calls and perform actions against the ConfigMgr site server. There are many uses for this functionality, but for the purposes of this article, we will only be using the ability to get applications. For further information, please refer to What is the Administration Service – Configuration Manager and How to Set Up the Admin Service – Configuration Manager on Microsoft Learn.
You can accomplish numerous tasks by leveraging dynamic applications. This post covers only the basic methods of leveraging them with PowerShell and the Administration Service. I will not cover how to ensure that your administration service is set up correctly, just one way to leverage it.
When creating task sequences, it can be a time-consuming task to add in every application that you want to deploy to an environment. And every time you add an updated version of that application, you must go back into every task sequence and update the application in there so that you are deploying/installing the latest one you packaged up. This post can help alleviate a lot of that time you may spend doing just that. The attached script will query the Administration Service for all the applications in your environment, then create task sequence variables with those applications from that list that you wish to install. The beauty lies in using wildcard characters to pull all applications that start with the name you choose, then select the latest version from that list to add to a variable. This means that you will no longer have to worry about modifying your task sequence every time you update/create a new version of the application, thus saving time. The only time you would have to go back into those applications in your Task Sequence is when you want to add or remove applications.
Step-by-Step Guide to Install Applications Using the ConfigMgr Administration Service
- Start by copying and pasting the attached script into your editor of choice
- Modify line 29 to include the service account password required for accessing the administration service
- Modify line 30, adding in the domain and username that will be used to access the administration service
- Modify line 31, adding in your ConfigMgr site server FQDN
- Follow the example on line 43 to add in the applications you wish to install
- Run the script and test that the results you are seeing match what you expect to see
Now let’s add it to our Task Sequence.
- Modify line 28 on your script and set Debug to $false
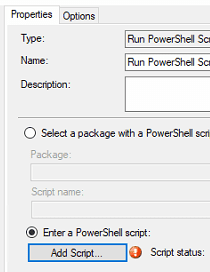
- In your Task Sequence, add a new step above your “Install Applications” step that Runs a PowerShell Script
- Check the radio button that says “Enter a PowerShell script”
- Click the Add Script button

- Copy and paste your code into the box pops up and click OK

- Change the PowerShell execution policy to “Bypass”

- Now click over to your “Install Applications” step
- Select the radio button for “Install applications according to dynamic variable list”

- In the “Base variable name” section, enter “XApplications”

- Click OK on the Task Sequence editor and you are good to go
Maximizing Efficiency with Automated Application Installation
In conclusion, by leveraging this automated process, you can significantly reduce the time spent modifying task sequences and manually updating applications. This method ensures you always deploy the latest versions efficiently. Now, there is one caveat to all of this that you need to be aware of. All your applications will need to have a check box checked on them. It is found on the Application Properties and it is called “Allow this application to be installed from the Install Application task sequence action without being deployed”.
You can find this script on my GitHub here.
Happy deploying!
<#
    .SYNOPSIS
    Get latest version of the applications for dynamically installing during Task Sequence

    .DESCRIPTION
    This script will reach out to the ConfigMgr Admin Service and retrieve all the available applications and then based on the applications you want to install, will dynamically set
    a task sequence variable to install the latest version.

    You will need to change lines 28 - 31 to suite your environment
    You will also need to modify line 43 for the applications you wish to install using the format of 'Google Chrome*'. Don't forget to include the * otherwise it won't pull the data
    correctly.

    In order to leverage this, on task sequences, add a step prior to the "Install Application" action called "Run PowerShell Script", copy and paste this code in the powershell
    area and set the policy to bypass. On the "Install Application" action, change to using a Task Sequence Variable and enter "XApplications"

    This is currently set in debug mode, you will take it out of debug mode by changing Line 28 to $false
    .EXAMPLE
    .Install-DynamicApplications.ps1

    .NOTES
    Version:        1.0
    Author:         John Yoakum, Recast Software
    Creation Date:  04/19/2024
    Purpose/Change: Initial script development

#>
# Script Variables
$Script:Debug = $True # Be sure to set this to False in production environment
$UserPassword = 'PASSWORD' # use service account password
$UserName = 'domainusername' # use domainserviceaccount
$SiteServerFQDN = 'FQDN of site server' # this is in the form of servername.domain.com

# Create the Array for storing all the applications
$Applications = [System.Collections.ArrayList]::new()

# Get all Applications in ConfifMgr
$Password = ConvertTo-SecureString “$UserPassword” -AsPlainText -Force
$Credential = New-Object System.Management.Automation.PSCredential (“$UserName”, $Password)
$AllItems = (Invoke-RestMethod -Method 'Get' -Uri "https://$SiteServerFQDN/AdminService/wmi/SMS_Application" -Credential $Credential).Value | Select-Object -Property LocalizedDisplayName,SoftwareVersion
$AllSortedItems = $AllItems | Sort-Object -Property LocalizedDisplayName,SoftwareVersion

# Enter in the applications you wish to install
$ApplicationsToInstall = 'Google Chrome*','Microsoft Visual Studio Code*','Recast Software Recast Agent*'

# Put together a single list of all the current applications to install
ForEach ( $Application in $ApplicationsToInstall ) {
    $ApplicationName = $AllSortedItems | Where-Object {$_.LocalizedDisplayName -like "$Application"} | Select-Object -Last 1
    $CurrentApp = New-Object PSObject -prop @{
        Name=$ApplicationName.LocalizedDisplayName
        }
        [void]$Applications.Add($CurrentApp)
}

# Set the Task Sequence Variable to those Applications
If (!$Script:Debug) { $tsenv = New-Object -ComObject Microsoft.SMS.TSEnvironment }
$Count = 1
$AppId = @()
ForEach ( $App in $($Applications).Name ) {
    #Add Code to add apps
    $Id = "{0:D2}" -f $Count
    $AppId = "XApplications$Id"
    If (!$Script:Debug) { $tsenv.Value($AppId) = $($App.Name) } else { Write-Host $App }
    $Count++
}


