Intune
How to Configure BitLocker on Windows Devices with Intune: Disk Encryption Profiles Method
Topics: Intune, Systems Management
Safeguarding sensitive data on the devices you manage is paramount. This becomes painfully clear when an employee loses a laptop or has it stolen. When you configure BitLocker on Windows devices with Intune, it provides a robust solution for disk encryption, ensuring that sensitive information remains secure and accessible only to authorized users.
My colleague Marty Miller recently wrote a post titled, How to Configure BitLocker with Intune using the Device Configuration Profile Method. Today’s post will walk you through the process of setting up BitLocker on Windows devices using Intune’s Disk Encryption Profiles method, offering peace of mind and enhanced security for your IT environment.
What is BitLocker?
BitLocker, a feature offered by Windows, helps encrypt volumes, aiding your organization in avoiding data theft and loss from malicious attempts. It’s a feature that enables encryption at rest.
Requirements to enable BitLocker with Intune:
- Microsoft Endpoint Manager Intune License
- Entra Joined or Hybrid Entra Joined device.
- Devices must have a TPM chip at version 1.2 or higher (2.0 recommend)
- Windows 10/11 Pro, Education & Enterprise
- BIOS set to Native EUFI
Built in roles to manage BitLocker:
- Help Desk Operator
- Intune Administrator
- Global Administrator
Create Endpoint Security Policy to Configure BitLocker
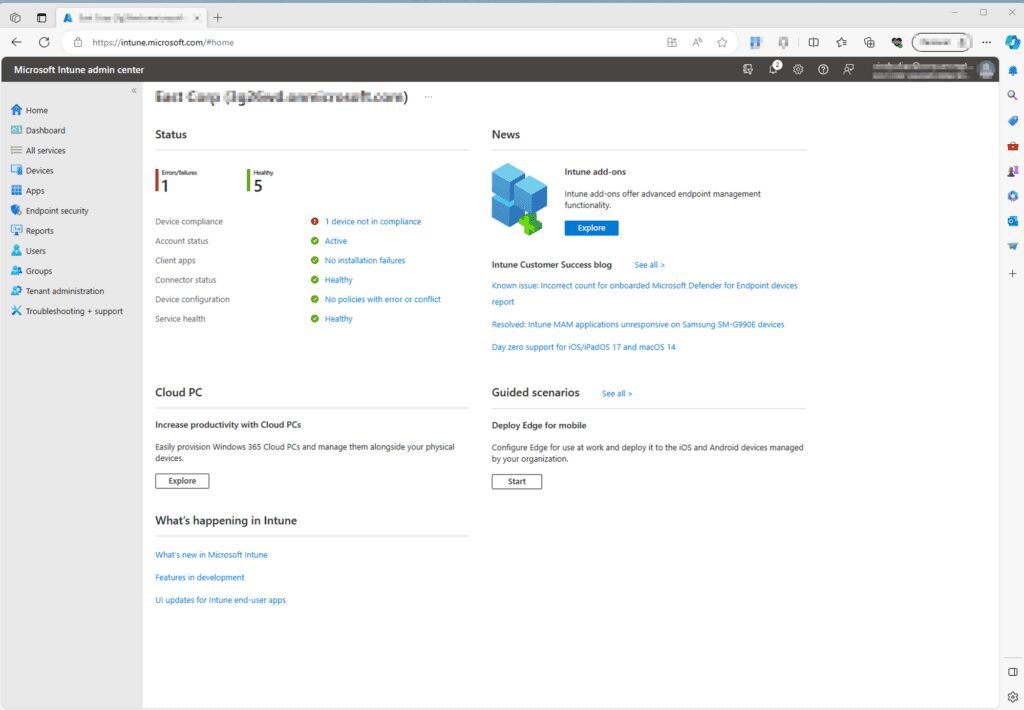
Sign into the Microsoft Intune admin center by going to https://intune.microsoft.com
Create a Profile
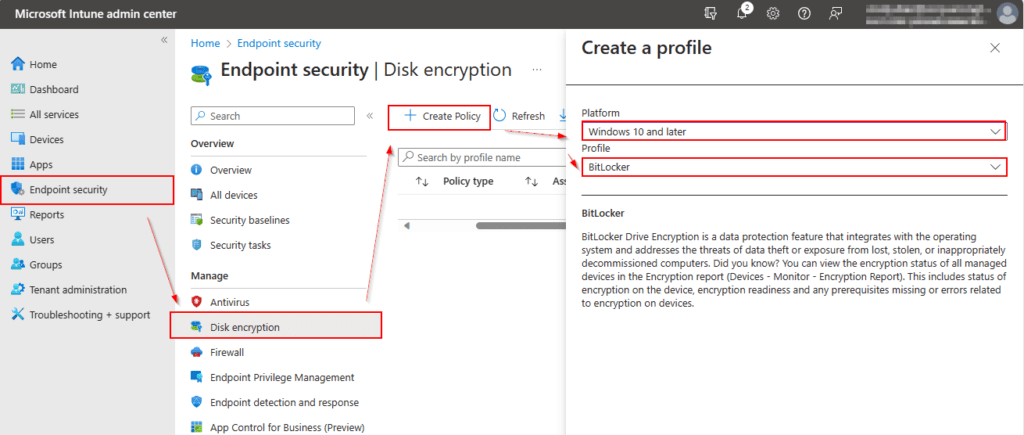
Select Endpoint Security on the left-hand panel > Scroll down and under “Manage” click on Disk Encryption > On the Disk encryption page click on + Create Profile > Platform: Windows 10 and later, Profile: BitLocker > click Create.
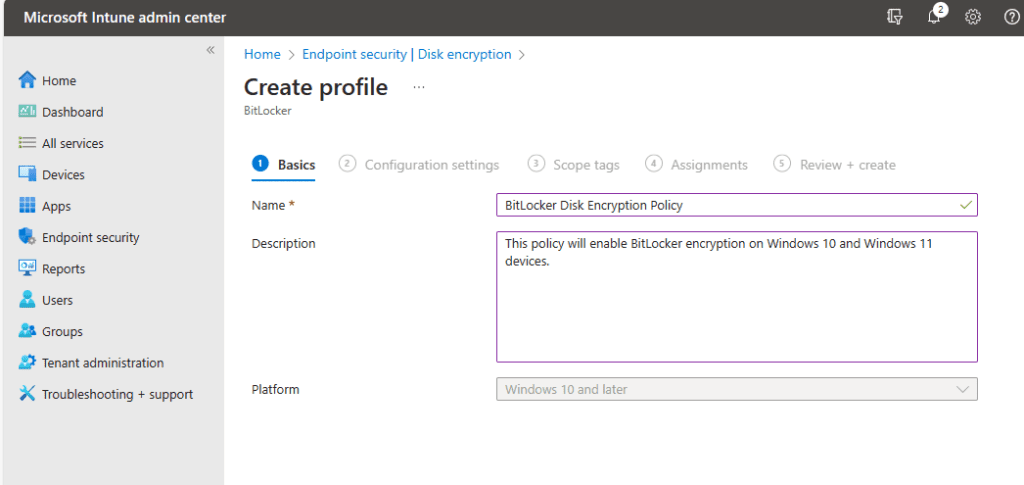
On the Basics page you will need to add a Name to the policy and an optional description. > click Next when ready.
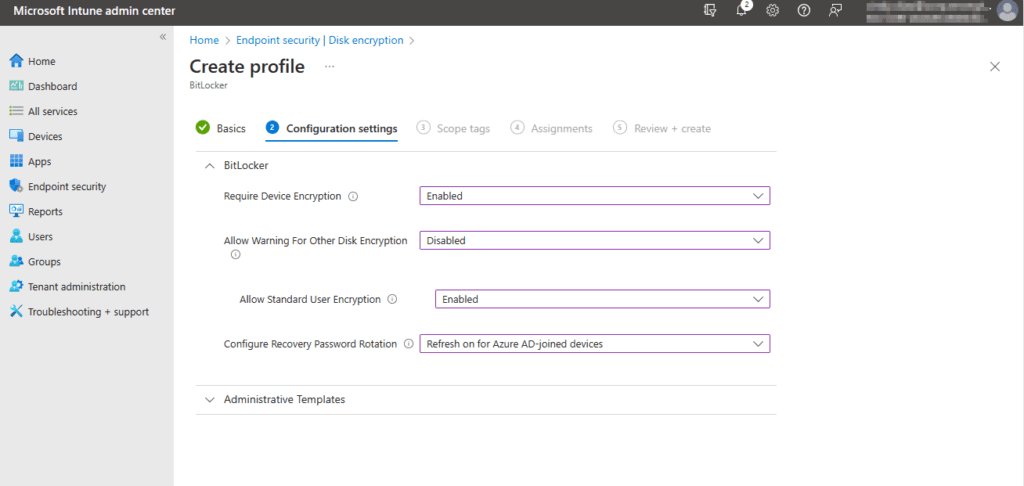
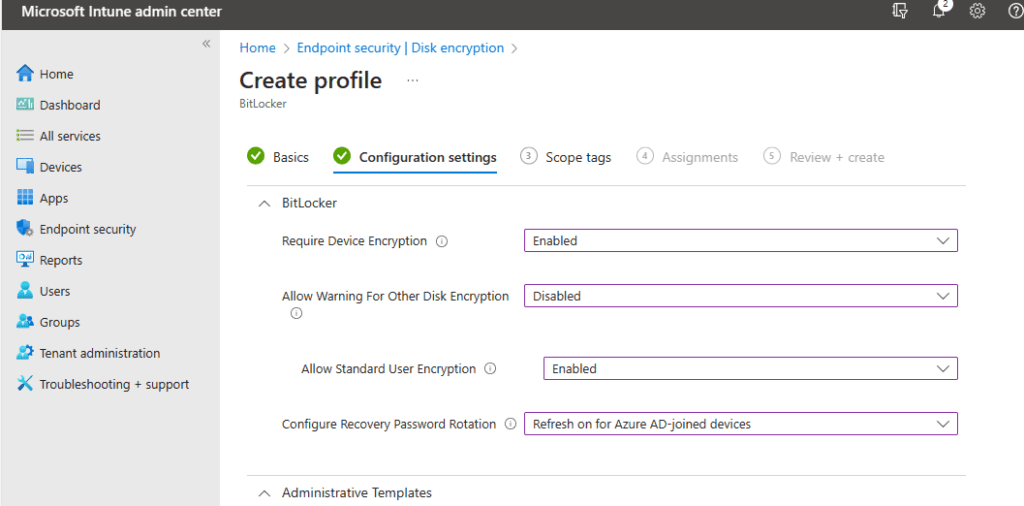
On the Configuration settings page, the BitLocker drop down menu shows the following:
- Require Device Encryption – This allows the IT administrator to enable or disable the requirement of BitLocker. By default, it’s set to not configured. In this case, I will set it to Enabled.
- Allow Warning for Other Disk Encryption – This allows admin to disable all notifications about BitLocker encryption or prompts to the users, for a silent deployment of encryption. If you select Enabled, your users will see a warning prompt and encryption notification. If you select Disabled, your users will NOT see a warning prompt or encryption notification. If left at default, users will see warning and notification prompts. I will go ahead and select Disabled to run a silent encryption.
⚠️ When “Disabled” is selected the Recovery key is backed up to the users Microsoft Entra account.
- Allow Standard User Encryption – Allows for Admin to enable BitLocker where the user logged in is not an administrator. If you select Enabled, this policy will try to enforce encryption on all drives even if the user on the device is a standard user. If you select Disabled, the policy will not be set and if the logged-on user is a standard user it will not try to encrypt any drives. In this case, I don’t care if the user is or is not an administrator. Either way, I want to push the policy. I will select Enabled.
- Configure Recovery Password Rotation – This is a setting that lets you rotate your BitLocker Password after you have used it to recover or unlock your device. You have four options. The first is Refresh off (default), which means BitLocker keys will not rotate after use. Next, you have Refresh on for Azure AD-Joined devices, this will rotate password after use on Azure AD-Joined Devices and the next choice is Refresh on for both Azure AD-joined and hybrid-joined devices, Here the password will rotate upon use on for Azure AD-Joined devices AND hybrid-joined devices. And last you have Not configured which, rotation is turned on by default for Azure AD-Joined devices and off for hybrid. In this case, I will select Refresh on for Azure-AD joined devices.
BitLocker Drive Encryption
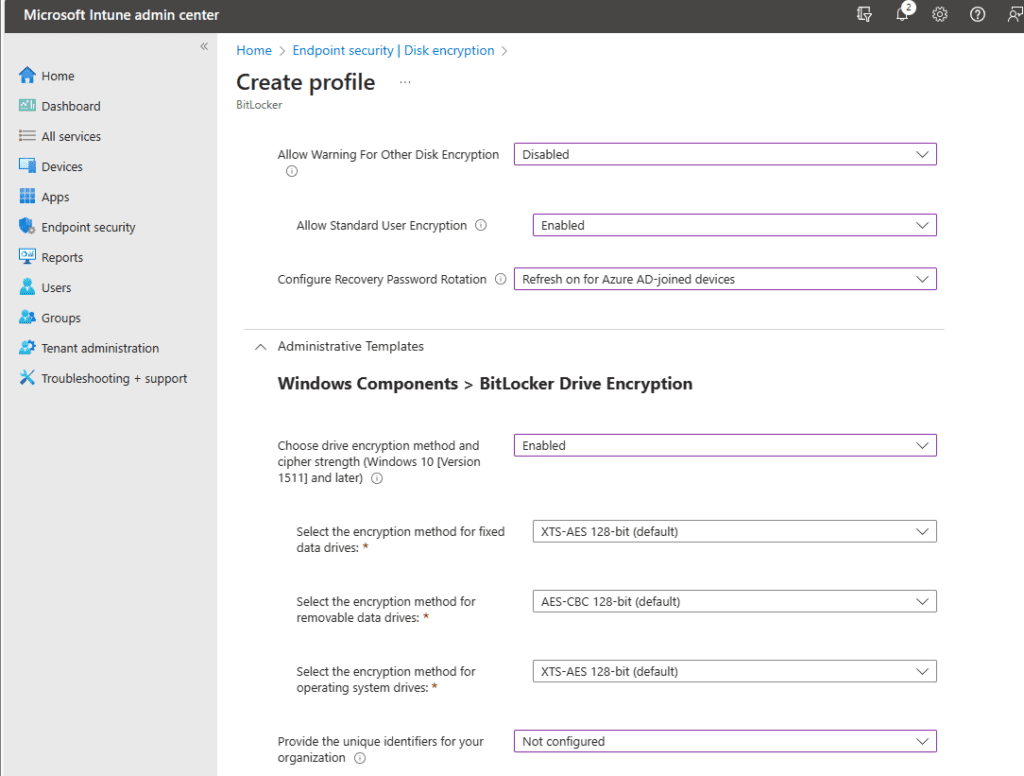
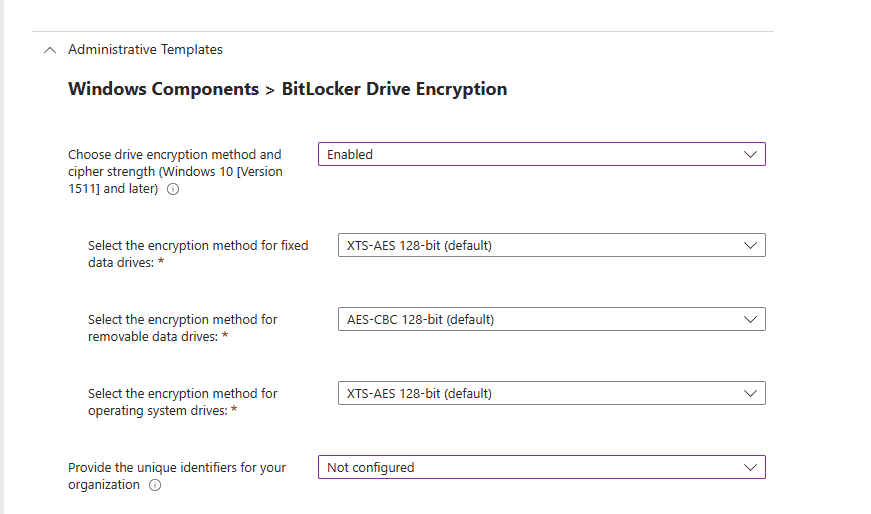
On the section below BitLocker, you are prompted with Administrative Templates where you can enable additional settings for BitLocker Encryption. I will go ahead and enable settings at a high level but please set the configurations based on your organization’s needs.
Under Windows Components > BitLocker Encryption you see the following Choose drive encryption method and cipher strength (Windows 10 [ Version 1511] and later): Here you can enable the algorithm and cipher strength that will be used for BitLocker Drive Encryption. I will select Enabled.
Once you select enabled, you will be prompted with other options on what encryption methods you want to use. I will keep all the defaults for the sake of simplicity.
Next, you see ‘Provide the unique identifiers for your organization.’ You can leave that as ‘Not Configured’ since you do not need to associate unique identifiers to your BitLocker protected drives.
Operating System Drives
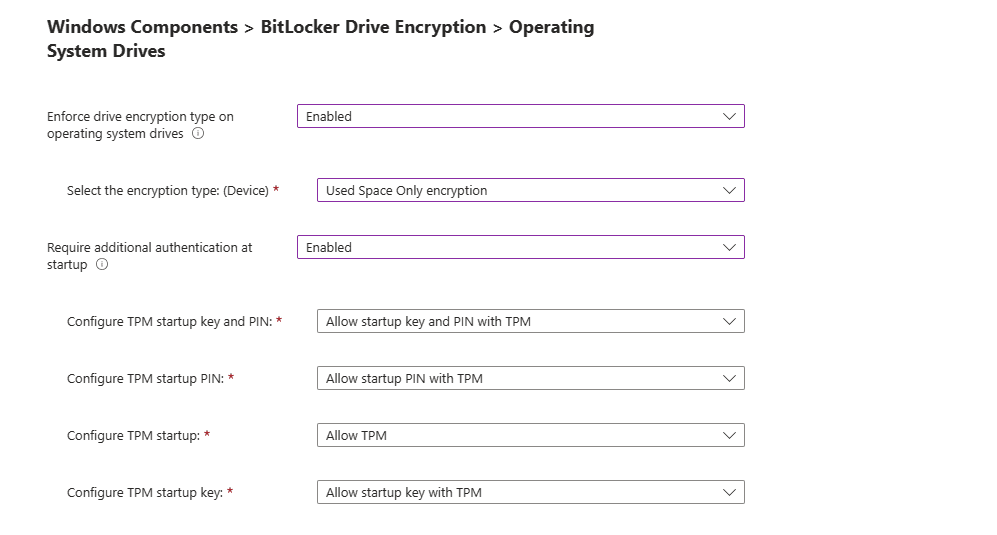
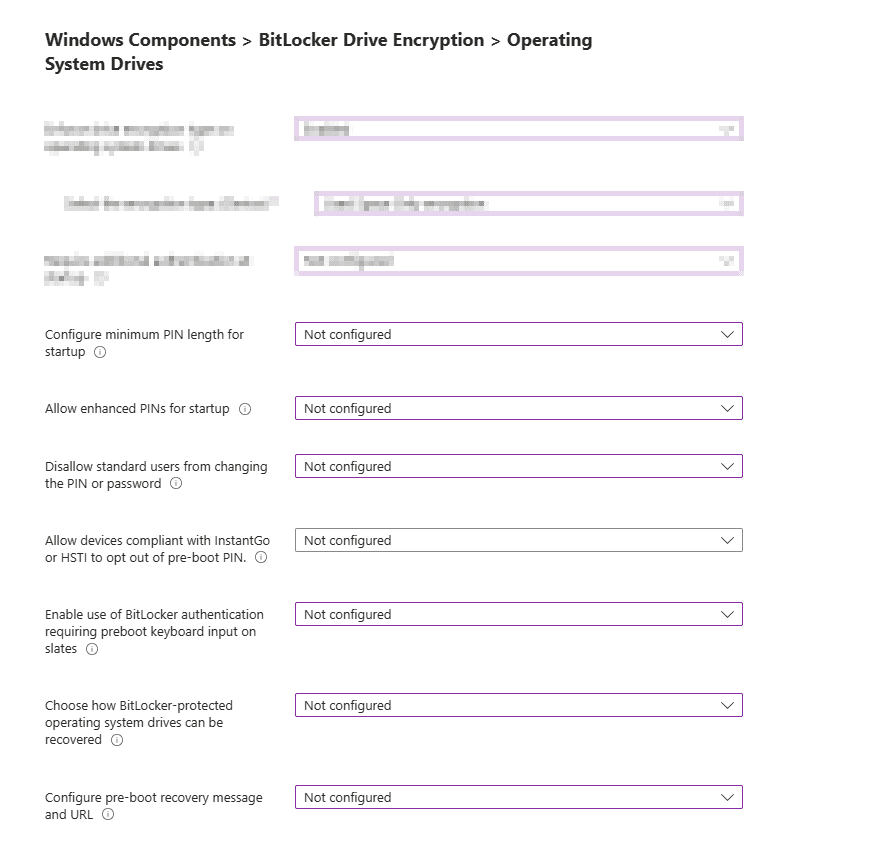
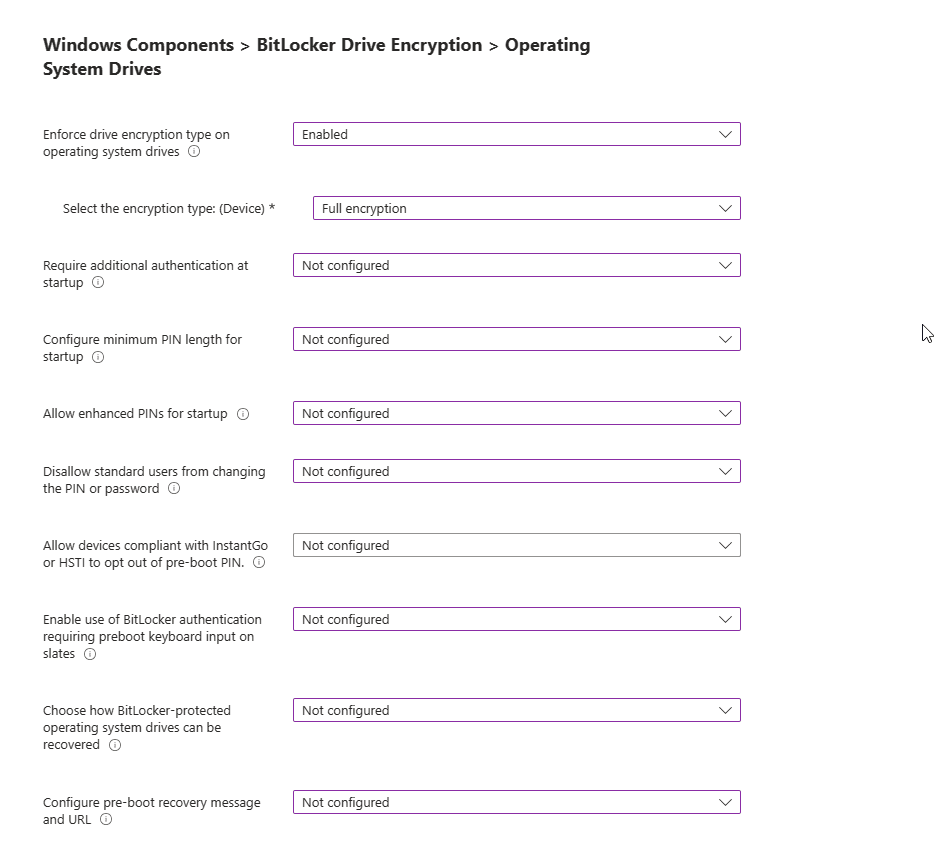
Windows Components > BitLocker Drive Encryption > Operating System Drives.
Enforce drive encryption type on operating system drives: This setting allows you to set up the encryption type you want used by BitLocker Drive Encryption.
Options:
- Disabled: If not enabled, the user will be prompted to select the encryption type before BitLocker is enabled.
- Enabled: This will determine the encryption type that BitLocker will use from this policy
- Not configured: (Default): Same as Disabled, user will be prompted to select the encryption type before BitLocker is enabled.
If enabled is selected, you can choose the encryption type:
Select the encryption type: (Device):
- Allow user to choose (default):
- Full Encryption
- Used Space Only encryption.

Next, you have the option to Require additional authentication at Startup.
Options:
- Disabled: No authentication needed at startup
- Enabled: You can require users to enter a password, pin etc. before they can access the encrypted data.
- Not Configured: No authentication needed at startup.
I will set mine to not configured but if enabled, you get the following prompts.
- Configure TPM startup key and PIN:
- Configure TPM Startup PIN:
- Configure TPM startup:
- Configure TPM startup key:
In the next section, you see the following (to avoid confusion, I will blur out the section already covered):
Configure minimum PIN length for startup: Which is a good choice if you want your users to have a PIN to unlock devices to access encrypted drives.
Configure enhanced PINS for startup: This allows for your users to use enhanced PINS with both upper or lowercase letters, numbers, spaces and symbols.
Disallow standard users from changing the PIN or password: If disabled or not configured standard users can change BitLocker PINS
Allow devices compliant with InstantGO or HSTI to opt out of preboot PIN: If this is not enabled, options of the top section Require additional authentication at startup is used.
Enable use of BitLocker authentication requiring preboot keyboard input on slates:
Choose how BitLocker-protected operating system drives can be recovered: This is a control to allow you to recover OS Drives in the absence of the startup key.
Configure pre-boot recovery message and URL: This will allow you to create a message or URL that is shown on BitLocker recovery screen when locked. This can provide you with information on next steps.
Fixed Data Drives
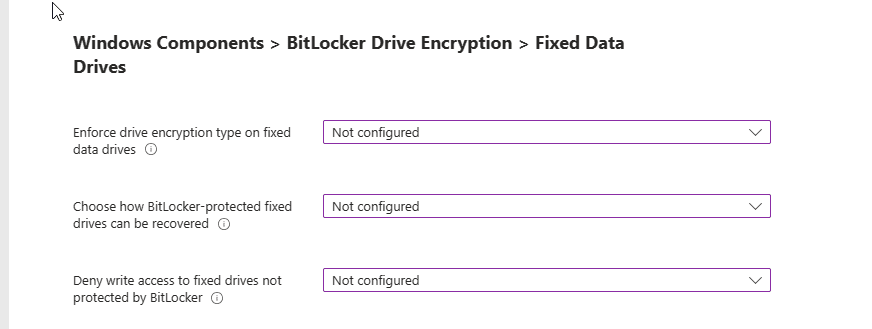
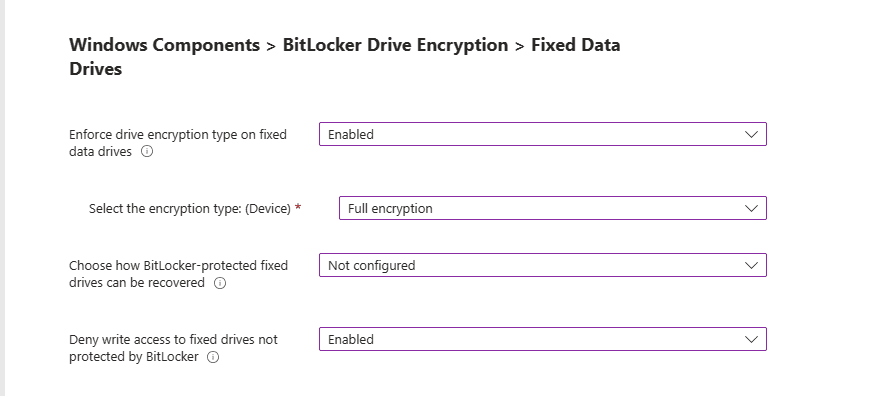
Almost there! Next up, Windows Components > BitLocker Drive Encryption > Fixed Data Drives.
You find the following options in that section:
Enforce drive encryption type on fixed data drives: This setting allows you to set up the encryption type you want used by BitLocker Drive Encryption.
- If enabled you can choose the encryption type: Full encryption, Used Space Only encryption and Allow user to choose (default)
Choose how BitLocker-protected fixed drives can be recovered: This is a control to allow you to recover OS Drives in the absence of the startup key.
Deny write access to fixed drives not protected by BitLocker: This gives you the control to allow you to give users the ability write data to drives not protected by BitLocker.
Removable Data Drives
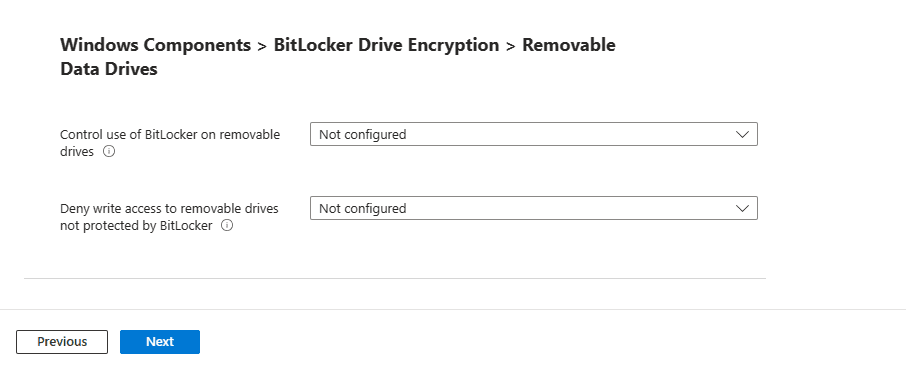
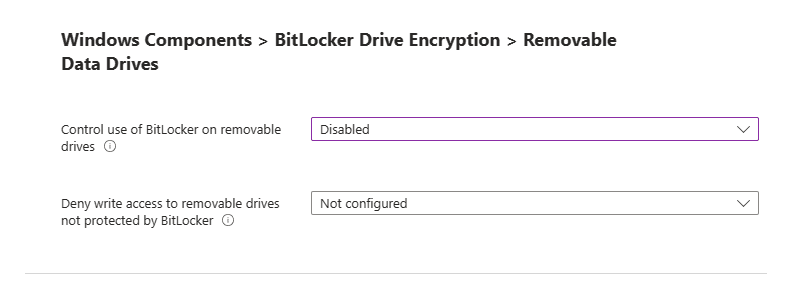
In the next section, you find Windows Components > BitLocker Drive Encryption > Removable Data Drives.
You find the following options for this section, which will cover how to configure BitLocker for removal drives such as external hard drives and USB drives.
Control use of BitLocker on removable drives: This is a setting that gives you the control to use BitLocker on removable drives.
Deny write access to removable drives not protected by BitLocker: This gives you the control to allow you to give users the ability write data to drives not protected by BitLocker.
Configuration Example
For Demo Only
I’ll show you what I have configured for demo purposes only. This is not a recommendation or advice for your environment.
BitLocker Section
Administrative Templates: Windows Components BitLocker Drive Encryption
Administrative Templates: Windows Components BitLocker Drive Encryption > Operating System Drives
Administrative Templates: Windows Components BitLocker Drive Encryption > Fixed Data Drives
Administrative Templates: Windows Components BitLocker Drive Encryption > Removable Data Drives
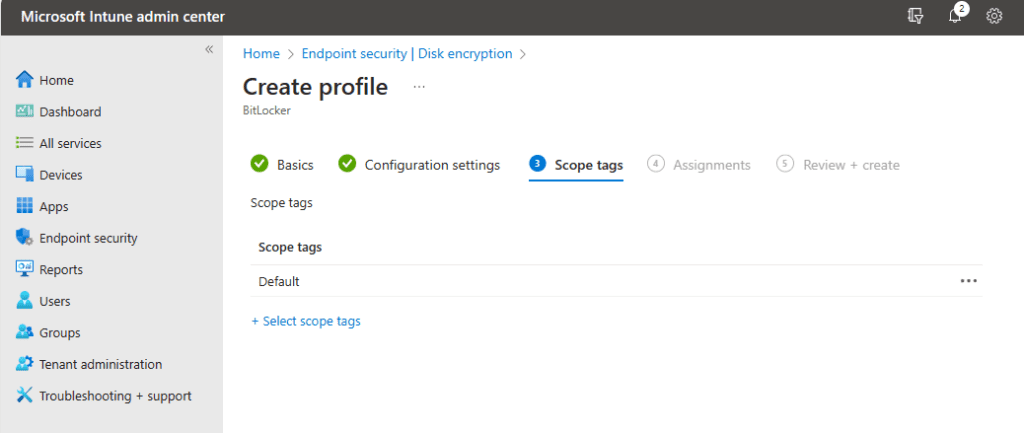
Once you configure this policy to meet your organizational needs, click ‘Next.’ You will land on the Scope tags page. Fill in as needed.
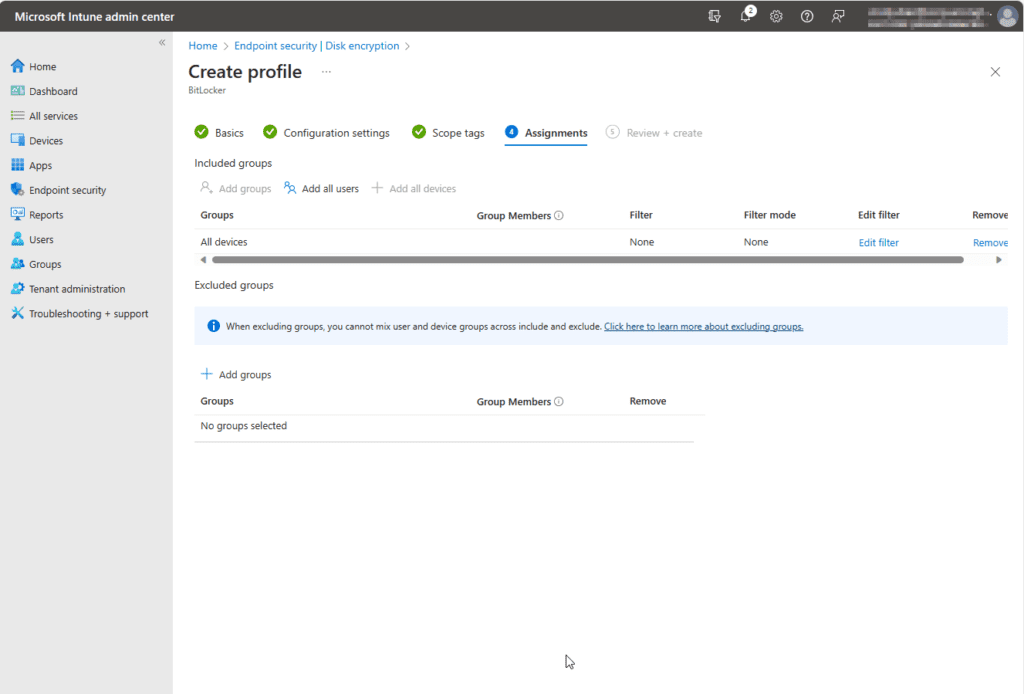
Select the assignment for this policy. I suggest starting with a pilot group before deploying company wide.
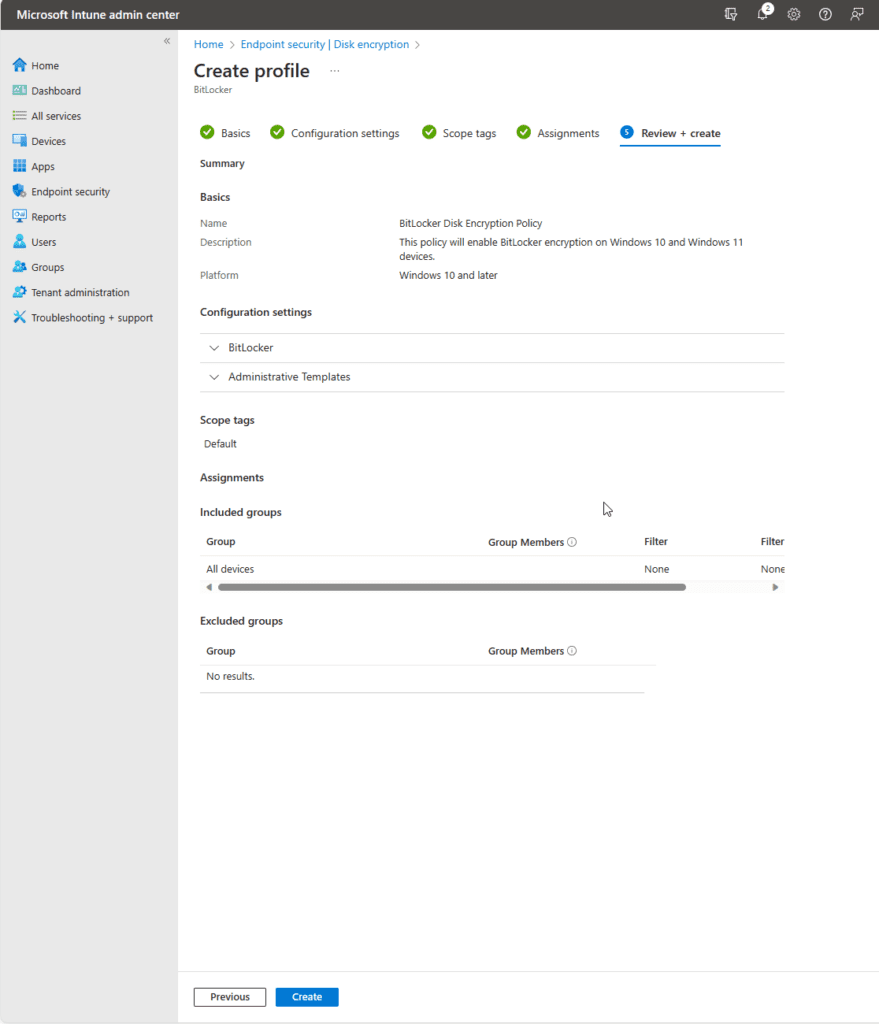
Once you have reviewed your configuration settings, go ahead and create.
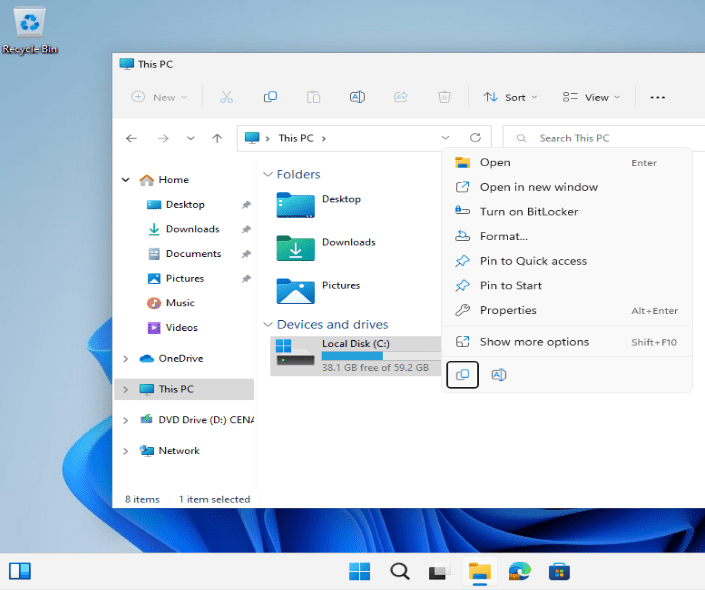
Check BitLocker Policy
Let’s check that the new BitLocker policy is working correctly. Currently on my test device, I can see that my machine’s disk is not encrypted as I have the option to Turn on BitLocker. I will go ahead and sync this device through the Intune portal to force the policy just created.
After a few syncs, I can see BitLocker is enabled.
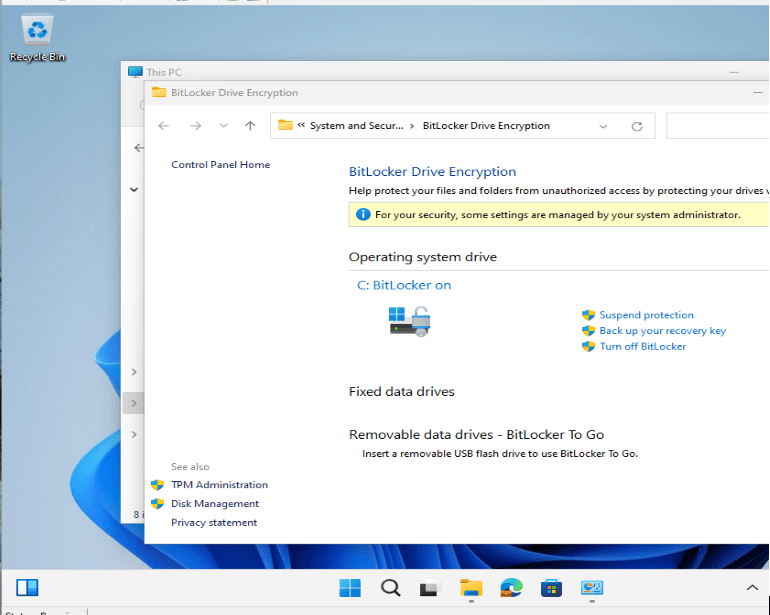
Configure BitLocker on Windows Devices with Intune
BitLocker Successfully Enabled
The integration of BitLocker with Microsoft Intune offers a streamlined and secure approach to disk encryption on Windows devices. By following the steps outlined in this guide, you can effectively protect sensitive data from unauthorized access, significantly reducing the risks associated with lost or stolen devices. Remember, adapting these settings to the specific needs of your organization is crucial for optimal security.
If you have any questions or require further assistance in configuring BitLocker with Intune, do not hesitate to reach out to me via Twitter or via our support team. Stay proactive in your cybersecurity efforts and ensure your organization’s data remains protected and compliant.


