Intune
Automating Intune Tasks with Azure Automation: A Beginner’s Guide
Topics: Intune
Azure Automation provides a powerful platform for automating tasks and orchestrating workflows not only within your Azure environment but also for external services like Microsoft Intune. By leveraging Azure Automation, you can automate repetitive Intune management tasks, enforce compliance, and streamline device management—all while reducing errors and improving efficiency. In this blog post, I’ll guide you through creating your first Azure Automation Runbook to interact with Intune.
Requirements for Creating an Azure Automation Runbook for Intune
- An Azure subscription
- Access to the Azure portal (you can sign up for free here)
- Microsoft Intune integrated with your Azure AD tenant
Step-by-Step Guide to Creating Your First Azure Automation Runbook for Intune
Follow these steps to create an Azure Automation Runbook that interacts with Intune.
Open the Azure Portal
Navigate to the Azure Portal and log in with your Azure credentials.
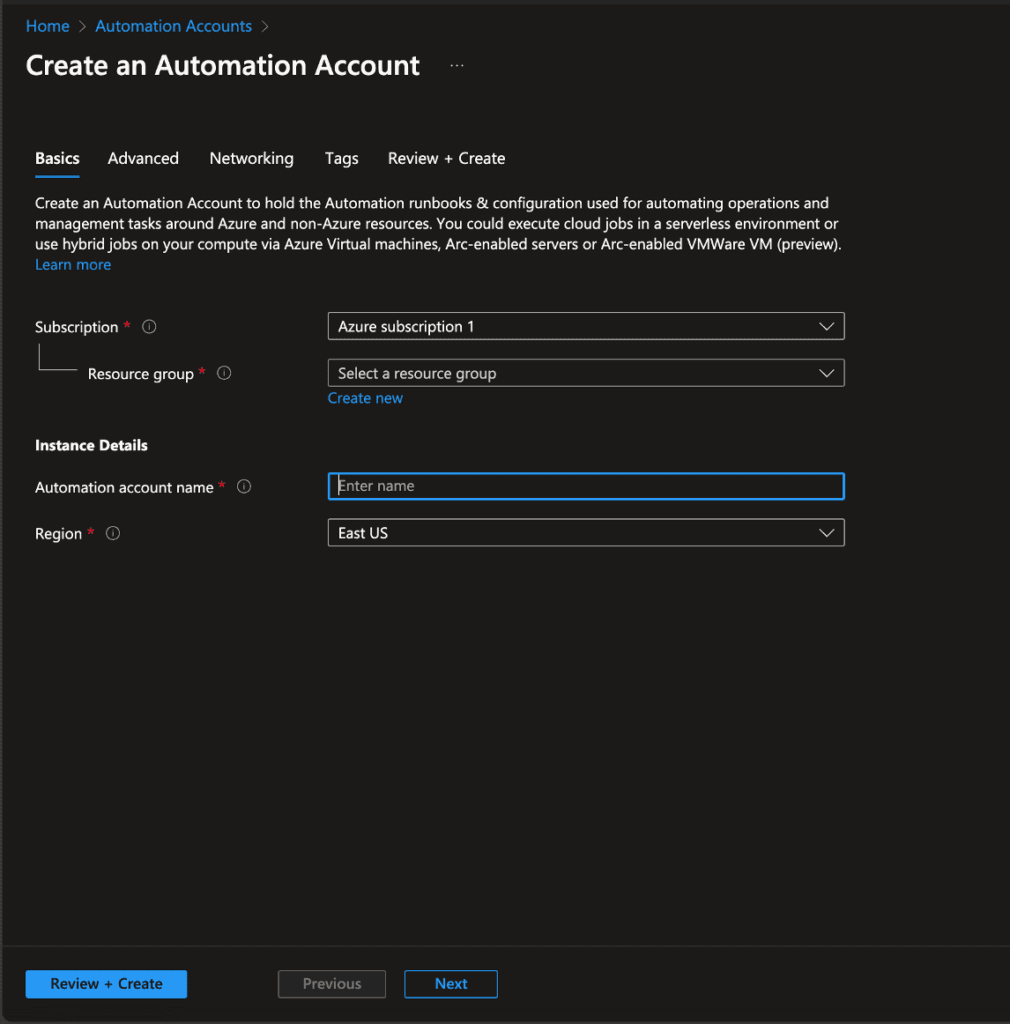
Create an Automation Account
- In the portal, click on the Search bar at the top and search for “Automation Accounts”.
- Select Automation Accounts from the search results.
- Click on + Create to start creating a new Automation Account.

Configure Your Automation Account
- Name: Provide a unique name for your Automation Account (e.g., IntuneAutomationAccount).
- Subscription: Choose your Azure subscription.
- Resource Group: Select an existing resource group or click Create new to make a new one.
- Location: Choose your preferred Azure region.

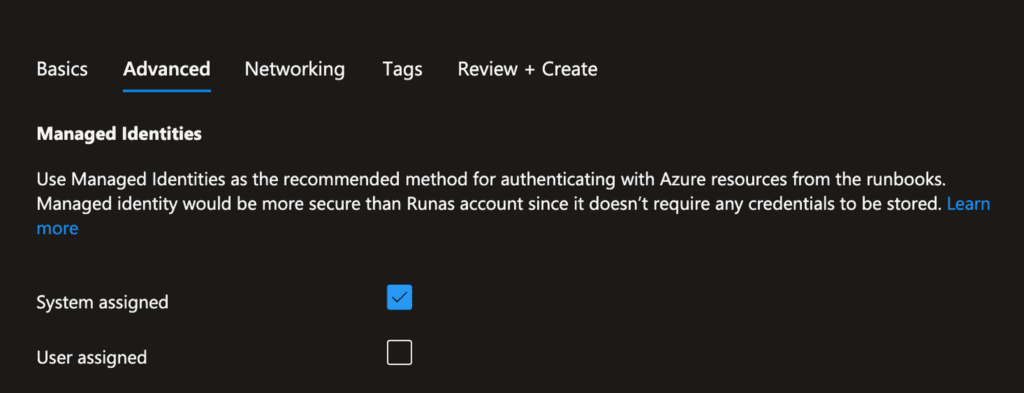
Ensure that the managed identity is deployed.

- Click Review + create, then click Create to deploy your Automation Account.
Alternative Way to Enable Managed Identity for Your Automation Account
- Navigate to your Automation Account.
- Under Account Settings, click on Identity.
- Switch the Status to On for the System Assigned managed identity.
- Click Save.
Assign Microsoft Graph Permissions to the Managed Identity
To allow the Automation Account’s Managed Identity to access Intune data via Microsoft Graph, run this following script in an Azure PowerShell:
Install-Module Microsoft.Graph -Scope CurrentUser

Connect-MgGraph -Scopes Application.Read.All, AppRoleAssignment.ReadWrite.All, RoleManagement.ReadWrite.Directory

$managedIdentityId = "Managed Identity Object ID"
$roleName = "Mail.Send"

$msgraph = Get-MgServicePrincipal -Filter "AppId eq '00000003-0000-0000-c000-000000000000'"
$role = $Msgraph.AppRoles| Where-Object {$_.Value -eq $roleName}

New-MgServicePrincipalAppRoleAssignment -ServicePrincipalId $managedIdentityId -PrincipalId $managedIdentityId -ResourceId $msgraph.Id -AppRoleId $role.Id

Disconnect-MgGraph
Import the Microsoft Graph Modules into Azure Automation
- In your Automation Account, under Shared Resources, click on Modules.
- Click + Browse gallery.
- Search for Microsoft.Graph.Intune.
- Select the module and click Import.
- Repeat this process for Microsoft.Graph.Authentication.
Create a Runbook
- In your Automation Account pane, under Process Automation, click on Runbooks.
- Click on + Create a runbook.
Configure Your Runbook
- Name: Provide a name for your Runbook (e.g., Get-IntuneDeviceOverview).
- Runbook type: Select PowerShell.
- Description: Optionally, add a description.
- Runtime version: Choose 5.1.
- Click Create to create the Runbook.
Edit Your Runbook Script
After creating the Runbook, you’ll be taken to the editor where you can write your PowerShell script.
PowerShell Script to Retrieve Intune Device Overview
# Get-IntuneDeviceOverview Runbook

# Import the necessary modules
Import-Module Microsoft.Graph.Intune

Write-Output "Authenticating to Microsoft Graph using Managed Identity..."

# Authenticate using Managed Identity
$tokenAuthURI = "http://169.254.169.254/metadata/identity/oauth2/token"
$resource = "https://graph.microsoft.com"
$apiVersion = "2019-08-01"
$headers = @{"Metadata"="true"}
$params = @{
    "api-version" = $apiVersion
    "resource"    = $resource
}

$tokenResponse = Invoke-RestMethod -Method Get -Uri "$tokenAuthURI?`$(($params.GetEnumerator() | % { "$($_.Key)=$($_.Value)" }) -join '&')" -Headers $headers
$accessToken = $tokenResponse.access_token

# Set the authentication header
$authHeader = @{
    "Authorization" = "Bearer $accessToken"
}

Write-Output "Fetching Intune Managed Device Overview..."

# Call the Microsoft Graph API
$graphUri = "https://graph.microsoft.com/v1.0/deviceManagement/managedDeviceOverview"

$response = Invoke-RestMethod -Method Get -Uri $graphUri -Headers $authHeader

# Output the results
Write-Output "Total Devices: $($response.enrolledDeviceCount)"
Write-Output "Android Devices: $($response.androidCount)"
Write-Output "iOS Devices: $($response.iosCount)"
Write-Output "Windows Devices: $($response.windowsCount)"
Write-Output "MacOS Devices: $($response.macOSCount)"
Explanation
- Authentication: The script uses the Managed Identity assigned to the Automation Account to obtain an access token for Microsoft Graph.
- Invoke-RestMethod: Calls the Microsoft Graph API endpoint to retrieve the managed device overview.
- Output: Displays the total number of devices and the count per platform.
Save and Publish Your Runbook
- Click Save to save your script.
- Once saved, click Publish to make the Runbook ready for execution.
Test Your Runbook
- Click Start to test your Runbook.
- You’ll be prompted to provide any parameters (for this example, there are none).
- Click OK to start the Runbook.
- You can monitor the job progress and view the output once it’s completed.
Schedule Your Runbook
To run your Runbook on a schedule:
- In your Runbook pane, click on Schedules under Resources.
- Click + Add a schedule.
- You can create a new schedule or use an existing one.
- Name: Provide a name for the schedule (e.g., DailyIntuneReport).
- Recurrence: Choose the recurrence (e.g., Recurring).
- Frequency: Select Day, Hour, etc.
- Interval: Set the interval (e.g., every 1 day).
- Start time: Set the start time.
- Time zone: Set your preferred time zone.
- Click Create.
Link the Schedule to Your Runbook
- After creating the schedule, you’ll need to link it to your Runbook.
- In the Add a schedule pane, select the schedule you just created.
- Optionally, specify any parameters or run settings.
- Click OK.
Conclusion
This blog demonstrates how you can automate Intune tasks using Azure Automation without writing code outside the Azure portal. While this is a simple example, you can extend it to perform more complex operations such as device compliance checks, configuration updates, or integration with other services.


