Application Management and Patching
Application Workspace Automation and VMware App Volumes
Recently Application Workspace has been collaborating with VMware to simplify the process of creating what are called application packages for App Volumes 4.
Using VMware Workstation and Application Workspace Automation, we came up with a fairly simple process to create App Volumes packages automatically. This process uses a VMware Workstation Virtual Machine, the App Volumes Packaging Utility, Application Workspace Managed Packages, and Application Workspace Deployment.

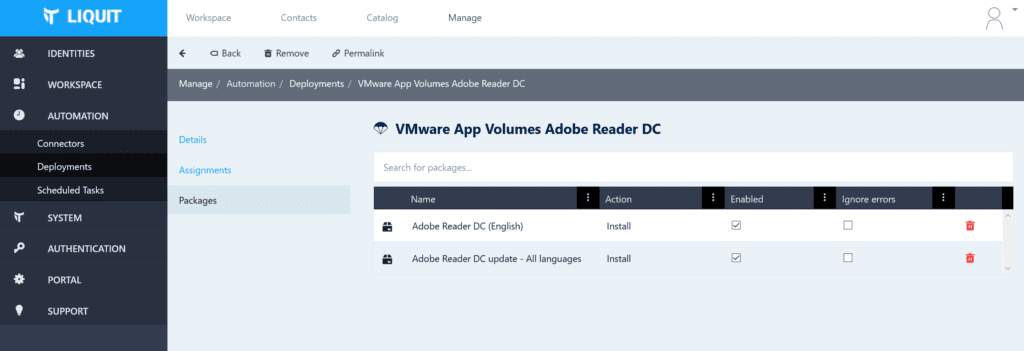
In the ‘sneak peek’ example above we’ve used a Application Workspace Deployment called ‘VMware App Volumes Adobe Reader DC’ which uses two Adobe Reader DC managed packages which have been created using the Application Workspace Setup Store connector.
Then the Application Workspace agent and an agent configuration file similar to the one described in Application Workspace Automation and Deployment have been used to start the deployment process:
Two .cmd files are used to start both the Virtual Machine and the capture process:
StartAppCap.cmd and StartAppCapturePackaging.cmd.
StartCappCap.cmd uses vmrun to start a VMware Workstation Virtual Machine in which the Application Workspace Agent and the App Volumes Packaging Utility already have been installed. After the Virtual Machine has been started, it copies the agent.xml and StartAppCapturePackaging.cmd into the Virtual Machine.
@echo off
"C:\Program Files (x86)\VMware\VMware Workstation\vmrun.exe" start "F:\Windows 10 x64\Windows 10 x64.vmx"

rem ----
rem  '50' is the time it takes for the Virtual Machine to launch and to wait before the AutoLogin
TIMEOUT /T 50 /NOBREAK

rem --------------------
rem Copy all files to the Virtual Machine
rem --------------------
"C:\Program Files (x86)\VMware\VMware Workstation\vmrun.exe" -gu "Roel" -gp "P@ssw0rd" copyFileFromHostToGuest
    "F:\Windows 10 x64\Windows 10 x64.vmx"
    "E:\StartAppCapturePackaging.cmd"
    "C:\Users\Roel\Desktop\StartAppCapturePackaging.cmd"
TIMEOUT /T 5 /NOBREAK

"C:\Program Files (x86)\VMware\VMware Workstation\vmrun.exe" -gu "Roel" -gp "P@ssw0rd" deleteFileInGuest
    "F:\Windows 10 x64\Windows 10 x64.vmx"
    "C:\Program Files (x86)\Liquit Workspace\Agent\Agent.xml"
TIMEOUT /T 5 /NOBREAK

"C:\Program Files (x86)\VMware\VMware Workstation\vmrun.exe" -gu "Roel" -gp "P@ssw0rd" copyFileFromHostToGuest
    "F:\Windows 10 x64\Windows 10 x64.vmx"
    "E:\Agent.xml"
    "C:\Program Files (x86)\Liquit Workspace\Agent\Agent.xml"
TIMEOUT /T 5 /NOBREAK

rem --------------------
rem run AppCapture
rem --------------------
"C:\Program Files (x86)\VMware\VMware Workstation\vmrun.exe" -gu "Roel" -gp "P@ssw0rd" runProgramInGuest
    "F:\Windows 10 x64\Windows 10 x64.vmx" -activeWindow -interactive
    "C:\Users\Roel\Desktop\StartAppCapturePackaging.cmd"
Then the last command is used to start ‘StartAppCapturePackaging.cmd’ which looks like this:
@echo off

rem ----
rem  a VMware App Volumes Package called 'Adobe Reader DC.vhd' will be created in C:\AvPackages
rem  and a capture session is started
if not exist "C:\AvPackages" mkdir "C:\AvPackages"

"C:\Program Files (x86)\VMware\AppCapture\appcapture.exe" /New "Adobe Reader DC" /o "\\desktop-uck1gn9c\AvPackages"
TIMEOUT /T 2 /NOBREAK

rem ----
rem  this will start a Deployment called "VMware App Attach Adobe Reader DC"
"C:\Program Files (x86)\Liquit Workspace\Agent\ShellAPI.exe" deployment run "VMware App Attach Adobe Reader DC"
TIMEOUT /T 2 /NOBREAK

rem ----
rem  end the capture
"C:\Program Files (x86)\VMware\AppCapture\appcapture.exe" /end
Keep an eye on the VMware EUC blogs for news about App Volumes 4.
Recommended reading:
- How to create a managed package for a selected Setup Store title.
- Receive e-mail notifications about updated managed packages.
- Application Workspace Setup Store
Please contact our sales team to try Application Workspace.


