


Application Management and Patching
Liquit Automation and Deployment
Liquit integrates a number of advanced automation and management features to ensure that the workspace is always up to date with the latest applications. Within Liquit Automation, Deployments are used to sequence a set of application installations during the imaging process of both virtual and physical devices.
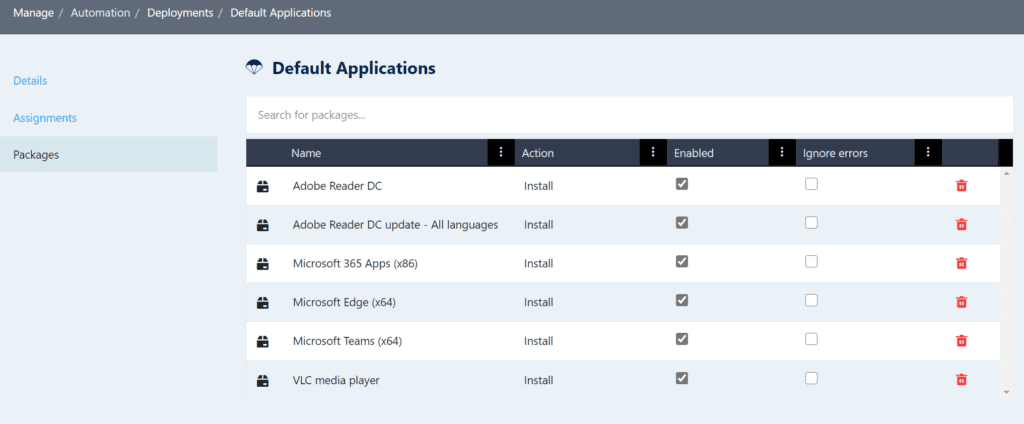
This blog describes how to create, configure and use a typical deployment which includes a few packages of default applications like Adobe Reader DC, Microsoft Edge, Microsoft 365 Apps, Microsoft Teams and VLC media player. Other examples of applications which you can include are covered here.
These are the steps to create a deployment called ‘Default Applications’:
- Click ‘Manage.’
- In the Automation section click ‘Deployments.’
- Click ‘Add.’
- In the ‘Add Deployment’ screen use ‘Default Applications’ for the deployment name, click ‘Next’ and then ‘Finish.’
- Leave the checkbox ‘Modify deployment after creation’ checked.
- Click ‘Assignments.’
- Search for and assign the device collection and/or devices you want to send this deployment to. In my example, I’ve assigned this deployment to a Device Collection Group called ‘Windows 10 Test VMs’. That group contains all my test Virtual Machines on which I’ve installed a Liquit agent and registered into my Liquit zone.
- Click ‘Packages.’
- Search for the packages you’ve created earlier and select them. They will be added to the packages list.
- Review the order and change the order when applicable just by using ‘drag and drop’. In the example below, ‘Adobe Reader’ needs to be installed first before you can apply the latest patch, e.g., as described here.
After you’ve configured the deployment, you need to configure an Agent Configuration file for the Liquit Agent. In this agent.xml the deployment ‘Default Applications’ is used:
<?xml version="1.0" encoding="utf-8"?>
<Config>
  <Log Id="agent">
    <Level>Info</Level>
  </Log>
  <Log Id="userhost">
    <Level>Info</Level>
  </Log>
  <Content>
    <Hash>True</Hash>
  </Content>
  <Login>
    <Enabled>False</Enabled>
    <SSO>False</SSO>
  </Login>
  <Icon>
    <Exit>True</Exit>
  </Icon>
  <Launcher>
    <State>2</State>
    <Close>True</Close>
    <Start>True</Start>
    <Minimal>False</Minimal>
    <Enabled>True</Enabled>
  </Launcher>
  <Deployment>
    <Enabled>True</Enabled>
    <Start>False</Start>
    <Cancel>False</Cancel>
    <Events>False</Events>
    <AutoStart>
      <Enabled>True</Enabled>
      <Timer>3</Timer>
      <Deployment>Default Applications</Deployment>
    </AutoStart>
  </Deployment>
  <Register>
    <Type>1</Type>
    <Username><![CDATA[LOCALwksimport]]></Username>
    <Password>P@ssw0rd</Password>
  </Register>
  <Server>https://yourliquitzone.liquit.com/</Server>
</Config>
This is to be used with the Liquit Agent MSI which can be downloaded from our Downloads page.
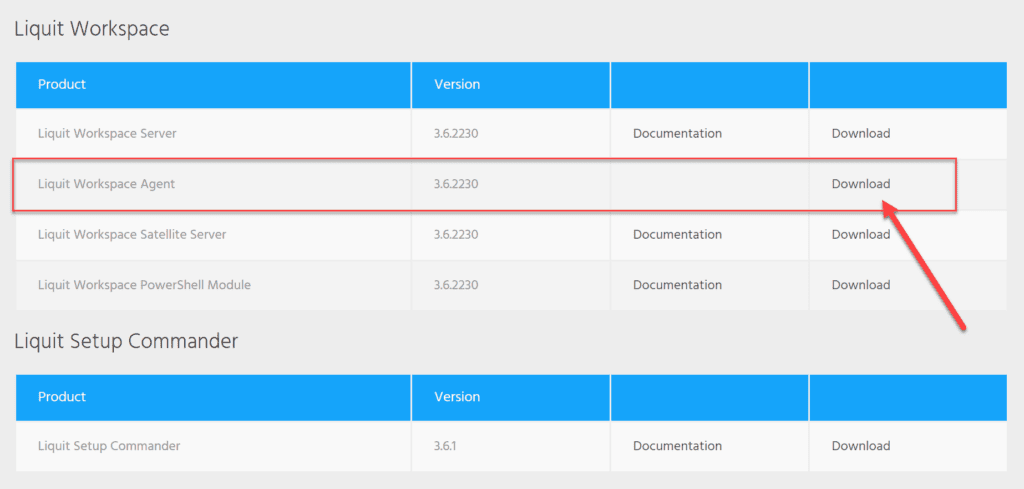
Save these two files in the same directory. When you install this MSI using something simple like a .cmd file, this agent.xml is automatically used during the installation:
@echo off
cls
msiexec.exe /i "Liquit-Workspace-Agent-3.6.2230.6391.msi" /qb!
In this case, this is how it looks when you use the above .cmd file after you’ve copied these three files into the same directory: install.cmd, agent.xml, and Liquit-Workspace-Agent-3.6.2230.6391.msi.
Note: Liquit Automation can be used in various deployment scenarios. For instance:
- To install applications after devices have been enrolled into Microsoft Intune.
- With Microsoft MDT to install default applications in your base image.
- With Microsoft WVD to install default applications in the base image.
- With VMware App Volumes to create App Volumes packages automatically.
I will cover each of these scenarios in depth in the upcoming series of blogs on Liquit Automation.
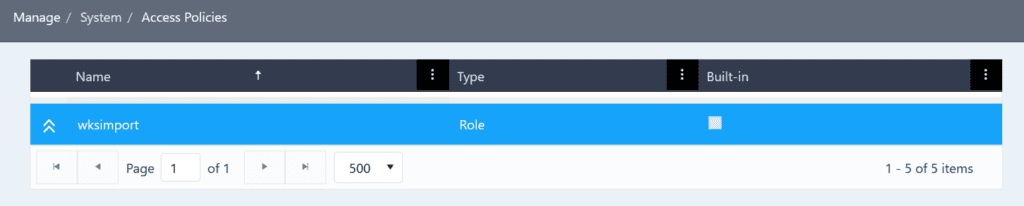
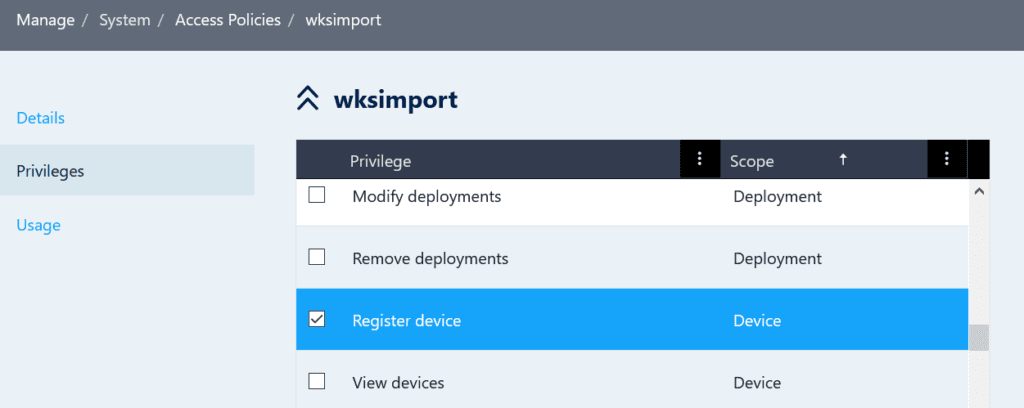
Note: In the agent.xml example, the username ‘wksimport’ (workstation import) is used. This user needs the privilege to register devices and must be created first.
To create a ‘wksimport’ Access Policy:
- Click Manage, then Access Policies, and then click Add.
- Select Role, then click Next.
- Enter ‘wksimport’ as the access policy name and click Next.
- Select and check the Register device Privilege, then click Next.
- Uncheck the Modify access policy after creation and click Finish.
To create a ‘wksimport’ user:
- Click Manage, Users, then click Add.
- Select LOCAL and click Next.
- Enter ‘wksimport’ as the username.
- Set a password that meets the password policy requirements.
- These are configured in the Identity Source LOCAL.
- To review the password policy, click Manage, then Identity Sources, select LOCAL, click Edit, and then select Password Policy.
- Click Next.
- Select ‘wksimport’ for the Access Policy and click Next.
- Deselect Modify user after creation and click Finish.

Conclusion
In conclusion, Liquit Automation streamlines the deployment of essential applications, ensuring that both virtual and physical devices are equipped with the necessary software from the start. By following the steps outlined in this blog, you can easily create and configure a deployment that includes key applications like Adobe Reader DC, Microsoft Edge, and Microsoft 365 Apps. Stay tuned for upcoming blogs where we will dive deeper into various deployment scenarios, including integrations with Microsoft Intune, MDT, WVD, and VMware App Volumes.